A few days ago I wrote an article about the issues with printer drivers in a multiuser environment. In this article I advised you to test you’re printer drivers in a acceptance environment, preferably with real users testing. This can be achieved with a LoadTest / StressTest tool like the Denamik LoadGen, which is free up to 25 users. And since testing with 10 users is enough to stress a driver, there’s no need to buy a license.
Today I would like to tell you how this is done, step-by-step.
The goal
We’re going to try to use the printer environment as realistic as possible, but where focusing on the worst case scenario. Because where trying to find out whether the printer driver is functioning correct when multiple users are printing, where going to simulate that a number of users are printing to printers using the same printer driver.
Scenario
In this example I’m going to log in to a Citrix environment with 10 users, open a PDF document and print the document to a printer using the driver I’m going to test. Then I’ll wait for a few seconds and print again, and again… This means that 10 users are printing almost continously and the Citrix server will be stressed.
So I would like to advice you NOT to do this on a production server, there’s a big chance things will crash. Isn’t this why you’re testing 😉
Step 1 – Setting up the printer environment
The first thing we need to achieve is installing a printer with the printer driver we want to test. This can be done like you usually would do, just add a printer and choose the printer driver.
When all drivers are already installed ( / synchronised) you can use the StressPrinters tool from Citrix to add all printers (remember to keep the printers instead of disposing them).
WARNING: Mapping a printer to LPT1: is the default setting which could result in print jobs which are never printed. This causes the print spooler directory (%windir%system32spoolprinters by default) to grows extensively! Either use a different location or cleanup during / after the test 🙂
After the printer is installed, share it so you can connect to it.
Last, you need to make sure you’re test users are connecting to the printer and set it as a default printer. You can do this by using a login script or a desktop management system like RES PowerFuse, AppSense of Quest vWorkspace.
Step 2 – Setting up the LoadTest environment
Simulating user actions can be done by manually logging in to a Citrix server and clicking the print button, but this would require at least 10 people. This would not only be unpracticle but expensive as well. Reason enough to use an automation tool who’s doing all the work for us. I’m going to use the DeNamiK LoadGen to simulate user actions.
The first step is downloading and installing the Denamik LoadGen. This is a straight forward process (next-next-finish).
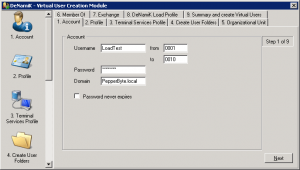
After installing the DeNamiK LoadGen where starting the Director, the console which controls the whole process. In this console where using the ‘DeNamiK Virtual User Creation Module’ to create users.

ADVICE: Create users called LoadTest0001 ~ LoadTest0010 and join them all in a AD group so you can control them all at once, for instance giving them access to a published application.
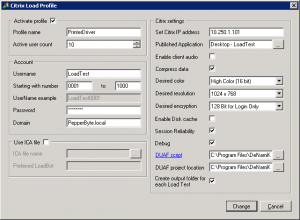
Next we need to create a ‘Load profile’. In this profile we’re specifying the details of the connection to the Citrix server. So this is where the credentials, ICA connection details and script location is placed. I’ll tell you more about the script in step 3.

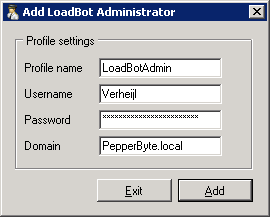
For a number of actions we need an administrative account. We need an account for controlling the LoadBot machines, I’ll discuss these later, and an account which is able to read performance data. Preferably this is the same account.
The credentials of these accounts needs to be added in the ‘LoadBot Administrator’ section.

The DeNamiK LoadGen uses LoadBot machines as a ‘bot’, these execute the commands directed by the Director. Sounds logical, right? These LoadBots needs to be addressed which is an easy step. Just click add and browse for the computer in the Active Directory. The Director will size the LoadBot for you (how many users can the LoadBot handle). Because where testing with just 10 users, one LoadBot is usually more than enough.
After adding the LoadBot(s) you can easily install, and active, the software by clicking ‘Install LoadBot’ and ‘Activate LoadBot’. The software is very small and non-intrusive, you can easily remove the software when you’re finished. So in theory you can you any computer in you’re environment.
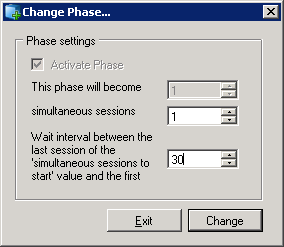
Now we have to choose the way the users connect. All at once or graduatly building up the number of users. In ‘Load Scenario’ you’re able to specify how many users are connecing at the same time, and how long to wait until the next user(s) should connect.
I would like to advise you to slowly increase the number of users. Wait 30 seconds between each user and connect one at the time (there’s no need to stress the server at this point).

Some drivers don’t hang or crash the server, but are (to) resource intense. This can be monitored by adding performance counters. In the tab ‘Performance counters’ you’re able to add all available performance counters from the components you’re testing. You need an administrative account to retrieve the performance data, this is where you’ll need a ‘LoadBot Administrator’ account. Because this article is about testing printer drivers, and not about LoadTesting, I’m not discussing this part in detail.
Step 3 – Simulating user actions
The DeNamiK LoadGen has a module called the ‘DeNamiK User Action FrameWork’ or DUAF. This is where you can simulate user actions, like browsing to an application and print. The module can be opened in the menu ‘Tools -> DeNamiK User Action FrameWork (Citrix)’.
After selecting a user (from a Load Profile) a session is started and a script editor is opened with a default script. Because the script is based on VB.Net it’s really easy to use.
The best thing about this session, is that it includes as session recorder. Each action you perform in the session is logged. And these actions can easily be copied in your DUAF script.
The DUAF script is started right after the session is connected, so as soon as a regular user would see a dialog box (like the logon dialog, or logon message) the script is active.
The first process that would occur is the logon process. DUAF can monitor these steps and, in case of an positive, result it would send an ‘DUAFHost.SendLogonSucces(0)’. This tells the Director that the logon process is successfully completed.
The easiest way of doing this is by waiting for the desktop, or an intranet which launches by default.
For example:
 'Set timeout to 30 seconds.

Const intTimeout = 30
'Wait for a screen region on the desktop (My Documents) to appear

If DUAFHost.ICASyncOnScreenShotRegion(69, 72, 6, 0, "4c699bff4c649ece705349577248b8f7", intTimeout) = False Then
‘The region did not appear on time. Logon has failed
DUAFHost.SendLogonFailed(0)
End If
Or
 'Wait for a window (Internet Explorer) to open

If DUAFHost.ICAWindowWaitActive(" - Microsoft Internet Explorer", intTimeout) = False Then
'The window did not appear on time. Logon has failed

DUAFHost.SendLogonFailed(0)

End If
After the logon process is completed I would like to start an application (Adobe Reader) from the start menu. Because it takes (some) time to open the start menu, just sending mouse clicks could result in a timing issue (you’re clicking on Programs while the start menu isn’t displayed).
This can easily be solved by using ‘DUAFHost.ICASyncOnScreenShotRegionOnMouseClick’ which is a combination of clicking the mouse, and waiting for a screen region.
After opening Adobe Reader, open a document and press the print button. Then wait a few seconds (DUAFHost.Idle) and repeat the process (using a Do While loop, or Goto).
Starting the test
We’re going to create two terminal sessions (RDP). One to the DeNamiK LoadGen (Director) and one to the Citrix server we’re going to test.
On the Citrix server with the printer drivers installed we want to see the following information:
– CPU and memory usage (task manager);
– Number of print jobs in the spooler (printer overview / details);
– Disk free space on the disk where the spooler files are placed;
– Some (custom) components which might fail.
The DeNamiK LoadGen machine is hosting the Director which is used to launch the user sessions and trigger the user actions. After the test is started you’re done, except checking the results on the Citrix server.

One thing you should check is whether the server still responds / refreshes in Terminal Server Administrator (TSAdmin). If it doesn’t, you’ve found a BAD driver.
Good luck testing you’re print drivers. Although this might sounds like a lot of work, it eventually will pay off. There’s nothing more frustrating than having ‘strange’ issues without knowing where to look for the solution.
PS: Unfortunately you won’t be able to be 100% sure the printer driver is stable. Sometimes a combination of certain printer drivers (PCL5 and PCL6) could result in bad behavior. and the same thing could happen with certain applications.
Ingmar Verheij