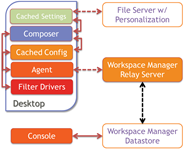
 With the release of RES Workspace Manager 2012 a new component was introduced: the Relay Server. In this article I’ll explain what the Relay Server is, how it can help you in your Workspace Manager (WM) environment and reveal some of its mysteries.
- 1. Introduction
- 2. Use case(s)
- 3. Requirements
- 4. Security
- 5. Installation
- 6. Discovery
- 7. Sizing and performance monitoring
- 8. Other facts
- 9. Troubleshooting
1. Introduction
The Relay Server was introduced with RES Workspace Manager 2012 as an optional component. The Relay Server is an intermediate component between the RES WM Agent and the Workspace Manager Datastore, if required Agents can still connect directly to a Datastore. It is a Windows Service that can be installed on a Windows operating system and by default listens on TCP port 1942 (registered at IANA), the same port that’s used by the RES WM Agent (see other facts).
Intermediate storage
While the name suggest the Relay Server relays the traffic between a RES WM Agent and the RES WM DataStore it actually doesn’t, instead it acts as intermediate storage. The Relay Server polls for changes every x time (default 5 seconds)and updates its local cache after x time (default: immediately).
The Relay Server stores the entire RES Workspace Manger Datastore in its cache location: %ProgramData%\RES\Relay Server, this location can be changed. Since this location is on the system drive (by default) it will monitor the available free disk space to prevent resource depletion (see other facts).
Just like the Relay Server the RES WM Agent will poll the Relay Server every x time (default: 5 seconds) and update its local cache after x time (default: immediately)
Architecture
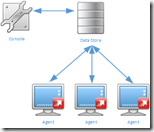 RES Workspace Manager stores all the configuration, logging and usage tracking data in a RES Workspace Manager Datastore. This makes the Datastorea critical component in a RES Workspace Manager infrastructure. When administering RES Workspace Manager the Console always communicates directly with the Datastore, never via a Relay Server.
By default Agents connect directly to the Datastore. This requires that the Agents are able to communicate to the Datastore, even when they are in 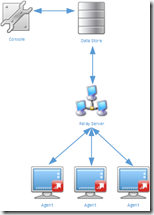 different locations. This could led to challenging situations because either the Datastore needs be replicated to multiple sites or each Agent communicates via a WAN connection to a remote Datastore.
In a large environment the server hosting the Datastore could reach its connection limit. With each Agent having two connections (one for the configuration database and one for the logging database) a Microsoft SQL server could reach its User Connection limit of 32.767 (see Maximum Capacity Specification for SQL Server). When the Datastore is stored on an Oracle server this limit is “100s of thousands”.
When Agents are configured to communicate with the Relay Server the number of connections to the Datastore is decreased to two per Relay Server, regardless of the number of Agents. This (of course) does not mean less license are needed, each agent still requires a license.
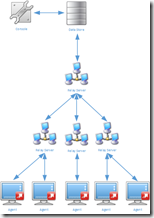 To prevent each Agent from communicating with the Datastore (or Relay Server) via a WAN connection a Relay Server can be placed in each remote site. With a Relay Server in a remote site only the Relay Server communicates over the WAN link, all agents can communicate via the LAN with the Relay Server. The configuration of multiple Relay Servers is straightforward, simple even. Especially when compare to configuring database clusters and it’s cheaper too.
Relay Servers can retrieve the content of the Datastore also from a sibling Relay Server, it doesn’t have to communicate directly with the Datastore. This makes the Relay Server architecture very flexible and scalable.
Separation of agents based on their location: Depending on their physical location agents could contact the nearest Relay Server. Martin Lako explained how this can be achieved using Workspace containers in this article.
2. Use case(s)
The use of a Relay Server in RES Workspace Manager is optional and it should only be used when necessary. As a general consideration: don’t overdesign your environment but keep it simple (KISS). There are number of use cases that could justify the use of an additional component:
- Prevent database cluster: High availability and resiliency is achieved by using multiple Relay Servers which are easier to setup and do not require an expensive license.
- Improve availability of the Datastore in a non-persistent environment: As explained here.
- No need for native database drivers on Agents: Since the communication with the Datastore is handled by the Relay Server this is the only machine that requires special drivers.
- Improved security: Credentials used to communicate with the Datastore are not required on the Agent or during installation, instead an environment password is provided which does not grant access to a database server.
- Less connections to your RES Workspace Manager Datastore: For instance to overcome the user connection limit of 32.767, see Maximum Capacity Specification for SQL Server.
- Minimize traffic for remote sites: Only the Relay Server communicates via the WAN instead of each Agent individually.
- Simplify Windows authentication for SQL: Instead of granting all users / computers access to the RES Workspace Manager Datastore only the Relay Server needs access to the Datastore, simplifying the agent and database configuration (as suggested by Iain Brighton in the comments).
If you have another use case that’s missing in this list, let me know in the comments.
3. Requirements
The Relay Server can be installed if the following prerequisites are met: :
- 500MB of free disk space + the size of the Datastore
- Microsoft .NET Framework 4.0 (or higher)
- An environment password is set
- When the Relay Server communicates directly with the Datastore: The database client (or native database drivers) for the used database type.
- When force protocol encryption is enabled the Microsoft SQL Native Client is mandatory
- RES software on MySQL (Ingmar Verheij)
- RES Workspace Manager / Relay Server on Oracle database platform (Wouter Arts)
The following operating systems are supported:
| Operating system | x86 | x64 | Note |
| Windows XP | X | X | May set a maximum on the number of inbound connections |
| Windows Server 2003 | X | X | |
| Windows Server 2003 R2 | X | X | |
| Windows Vista | X | X | May set a maximum on the number of inbound connections |
| Windows Server 2008 | X | X | |
| Windows 7 | X | X | May set a maximum on the number of inbound connections |
| Windows Server 2008 R2 | – | X | |
| Windows Server 2012 | – | X | Not 100% clear for Relay Server, see: Supported Platforms |
It is recommended to provide the Relay Server with a static IP address. However DHCP can be used since DNS will provide name resolution.
4. Security
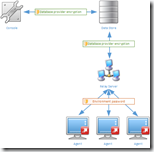 The data that’s transmitted between the Agents and the Datastore via the Relay Server contain configuration data that is potentially confidential. Some of the configuration data could contain credentials and usage tracking could contain data that should not be exposed. Altered configuration data could potentially redirect users to a compromised environment. When the risk of compromising configuration / usage tracking data is too high or a risk exists that configuration data is altered, data should be secured.
By default traffic between Agents and a Relay Server is encrypted with SSL using an environment password. Optionally traffic with the Datastore can be secured with database provider encryption.
Environment password
The Agents communicate with the Relay Server every x time (default: 5 seconds) and polls if there are changes made in the Datastore. When updated settings are available, of when the Agent has updated usage Tracking data, the Relay Server and Agent will exchange XML files. This traffic is encrypted with SSL using an environment password.
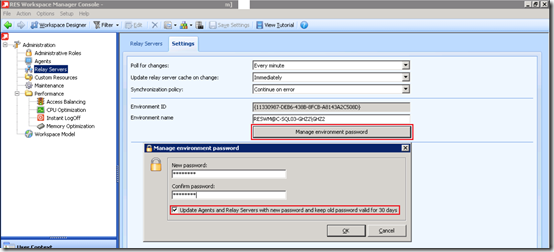
The environment password is a string value that needs to be provided via the RES Workspace Manager Console in the Administration\Relay Severs section. This value needs to be provided before the Relay Server is configured.
The Agents needs to be provided with the environment password when they are configured to communicate with the Relay Server (usually during unattended installation). When the password is changed the Agents can be updated with the new password and the old password can be kept valid for 30 days (this is optional). If the option is cleared or the 30 days are expired the password can be changed with the following command line:
“%RESPFDIR%\svc\res.exe” /config
Important: The environment password is not stored in plaintext but hashed( and then encrypted) for discovery via DHCP. The encrypted+hashed environment password always changes, even when the same password is chosen. Even though a different string is returned the agent is able to decode the same encryption password.
The hashed password can be retrieved by administrators with the following command line:
“%RESPFDIR%\pwrtech.exe” /gethashedpassword
Database provider encryption
“Encryption is the process of obfuscating data by the use of a key or password. This can make the data useless without the corresponding decryption key or password. Encryption does not solve access control problems. However, it enhances security by limiting data loss even if access controls are bypassed. For example, if the database host computer is misconfigured and a hacker obtains sensitive data, that stolen information might be useless if it is encrypted. “ – SQL Server Encryption, Microsoft TechNet
The RES Workspace Manager Datastore can be configured to use protocol encryption when connecting to Microsoft SQL (DBPROTOCOLENCRYPTION=yes)., When protocol encryption is enabled the communication between the Datastore and the Relay Server will be protected. The Microsoft SQL Native Client needs to be available on the Relay Server but not on the Agents (as they communicate with the Relay Server using a different protocol).
Windows authentication
Microsoft is trying to get the SQL Login deprecated and force Windows authentication. Besides that Microsoft strives to get rid of SQL login the Windows authentication is more secure since it relies on tickets instead of username/passwords.
Dave Bryant did an excellent job describing how to set up RES Workspace Manger 2012 with MS SQL Windows Authentication.
5. Installation
The installation of a Relay Server is very straightforward (next > next > finish) so I won’t bore you with that. What’s important is that all prerequisites are met and the RES Workspace Manager Datastore is configured.
Unattended
Just like any other component of RES Software the Relay Server can be installed unattended. To improve the repeatability of the configuration (and because I’m lazy) I try to automate as much as possible. The Relay Server comes in two flavors:
- 32-bit systems – RES-WM-RelayServer(x86).msi
- 64-bit systems – RES-WM-RelayServer(x64).msi
Depending on your processor (and OS) architecture you can choose the associated installation. The unattended installation be executed by providing a configuration file or using public properties specifying the Datastore or the parent Relay Server.
Configuration file
A configuration file is an XML file that contains connection information that was stored previously on another Relay Server installation. The configuration file is saved in the RES Workspace Manager Relay Server Configuration by pressing the Save to XML button. To install the Relay Server unattended using a configuration file the following argument needs to be provided:
msiexec /I RES-WM-2012-RelayServer(x64).msi ConfigFile=%RESInstallFolder%\RelayServerConfiguration.xml /qb-
Important: The configuration file needs to be stored on a local drive, a network drive is not supported.
Public properties
In the Getting Started with RES Workspace Manager SR4 Relay Server the following can be read:
“Unattended installation alone will not connect the newly installed Relay Server to any RES Workspace Manager environment. To configure this connection after the unattended installation, open the Relay Server Configuration tool.”,
What is a bit odd is that at the next page public properties are listed to provide the details of the Datastore or a parent Relay Server. Nonetheless, they are ignored. The only way of installing the Relay Server unattended is using the configuration file.
I’ve asked RES Software to elaborate on the public properties. Once I receive an answer I will update this section.
Update June 10th 2014: The public properties will be removed from the documentation.
SQL And Windows Authentication
If you don’t want (or can’t) use a SQL login you can configure the Relay Server use Windows Authentication. Dave Bryant wrote an article at the RES Software Blog explaining the steps involved. You can read the article here.
Using a service account to use Windows Authentication is optional. As an alternative you can keep the service running with the Local System Account (the default setting) and grant the computer account (the machine running the Relay Server) the required permissions on the database.
6. Discovery
After the Relay Server is installed and configured the RES Workspace Manager Agents needs to be configured to contact the Relay Server instead of a Datastore. The location of the Relay Server in an Agent is configured with a “discovery”.
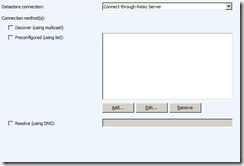
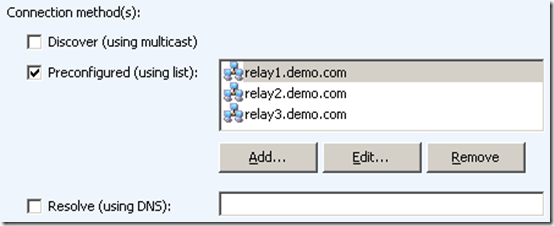
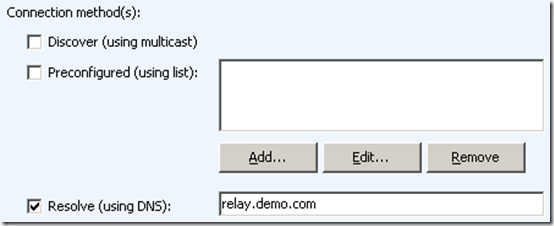
In the RES Workspace Manager Console in the Administration > Agents section the settings of the Agent can be configured. One of the configuration settings is Datastore connection. This value is either Connect to Datatore or Connect through Relay Server. When the Connect through Relay Server is configured the following connection method(s) are selectable.
- Discover (using multicast)
- Preconfigured (using list)
- Resolve (using DNS)
There is a fourth discovery method: DHCP (available since RES Workspace Manager 2012 SR3).
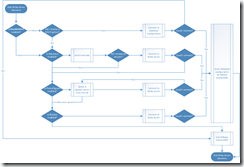
The discovery methods are executed in the same order as they are displayed. The selected discovery methods are tried until a successful connection is made.
If the Agent can’t connect to the provided Relay Server or the fallback (CachedDB) Relay Server it will use its local cached database (DBcache). An Agent configured with a Relay Server will never revert back to a direct Datastore connection. DHCP takes preference over Discover so effectively Agents discover the Relay Servers in the following order:
Fallback
What’s good to know is that once an Agent receives a Relay Server configuration – where it successfully can communicate with – it stores it in its local registry (as CachedDB) as a fallback. If the Agent receives a new datastore configuration via DHCP it will stop processing the list of other discovery methods. If the Agent cannot connect with the Datastore provided via DHCP it will revert back to the fallback (CachedDB). This means that if an Agent receives a faulty configuration via DHCP it will not try another discovery method. Effectively this means that all other discovery methods are skipped if a datastore configuration is received via DHCP. Keep this in mind if you want to use other discovery methods as a fallback.
Example
A customer has two datacenters with in each datacenter thousands of hosted private / shared desktops runningRES Workspace Manager. To avoid all Agents flooding the WAN connection contacting a Datastore multiple Relay Servers are placed in each datacenter (which contacts the Datastore). While the Relay Servers are available in each datacenter, the Agents have no idea which one it should contact if a list is provided (it chooses a random Relay Server from the list). So a DHCP discovery method is used to provide the Agents with the Relay Servers from the same datacenter (this implicates that each datacenter has it’s own DHCP scope).The general though was that if the Relay Servers in the first datacenter are unavailable the Agents are allowed to contact the Relay Serversin the second datacenter, as a fallback. So as a second discovery method the list is provided containing all Relay Servers.
Unfortunately (as described above) the list is never queried if a Datastore configuration is received, regardless if it can contact the Datastore.
DHCP
To provide a Datastore configuration to Agents via the Dynamic Host Configuration Protocol (DHCP) a vendor specific option (43) needs to be provided to the client. The DHCP option contains the Datastore configuration, the value can be retrieved from the RES Workspace Manager Console via Administration > Relay Servers > Settings > Export connection string to file
This will create a file called WMRSConn.txt containing a text similar like below. This is the Datastore configuration string value used in the DHCP option. You need to replace relay1.example.com:2012 and relay2 with the address of the Relay Servers your Agents need to contact.
RESWMRS=relay1.example.com:2012;relay2;61687E686D65757474737E756A6A786B69757E647A6A636563736E686F636976;z4isOSFbt+JvWADSrpR3+/pOEyb1+fUITzs/IMdYvn6OyO08TUEJ6nXbGQJHtDbM8C0yRVMr9TcY8EumoXuX2MHrDVx9nEyPSW8ddGXv62/a8ZQm
With the string value of the Datastore configuration a DHCP option can be added to the scope. The DHCP option is a vendor specific option (43) with vendor class “MSFT 5.0” (Microsoft Windows 2000). Within the vendor specific option an option ID and value can be provided. The option ID can be chosen from 212 to 219, the value is the Datastore configuration. On a Microsoft DHCP server adding the DHCP option consists of two steps:
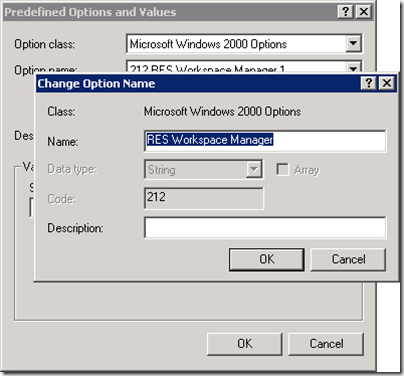
Step 1 – Adding a predefined option
- Log on to the DHCP server and open the DHCP snap-in.
- Select the DHCP server in the list and click Action > Set Predefined Options.
- At Option class, select Microsoft Windows 2000 Options
- Click Add
- Give the predefined option a Name (for example RES Workspace Manager)
- At Data type , select String.
- At Code specify an option ID with a number in the range from 212 until 219
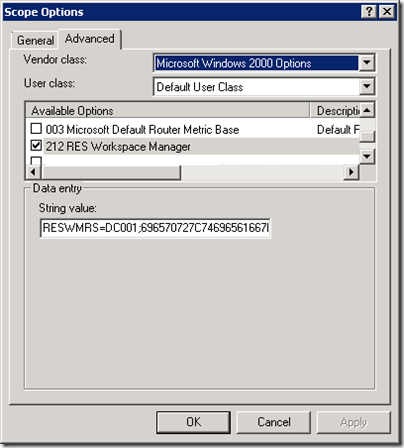
Step 2- Add DHCP option to scope
- Right-click the Scope Options node
- On the Advanced tab, select Microsoft Windows 2000 Options in the Vendor class field
- At User class, select Default User Class
- In the Available Options area, browse to the option that you created in step 1
- In the String value section enter the Datastore configuration you exported from the RES Workspace Manager Console
Keep in mind that a vendor specific option is not the same as a DHCP option. If you add a regular DHCP option with ID 212 ~ 219 it will be ignored by the Agent.
Learn more about (Microsoft) Vendor specific DHCP options and how to configure it on a non-Microsoft DHCP server here.
Troubleshooting
Troubleshooting the Datastore configuration via DHCP can be cumbersome. There are tools available that can be help you (like Wireshark). To simplify the troubleshooting I wrote a PowerShell script that shows all DHCP options received by the client.
Learn more about reading DHCP options and download the PowerShell script here.
Optionally the RES Workspace Manager Agent can be configured to ignore DHCP information by setting the following registry key to “True”,”yes” or “1”.
HKEY_Local_Machine\Software\RES\Workspace Manager\DisableDHCP
PS: DHCP actually provides a Datastore configuration which can contain a direct Datastore connection or a Relay Server configuration.
Discover (using multicast)
What’s very nice about this discovery method is that it requires no configuration (except when routing prohibits multicast) and high availability is very easy, only active Relay Servers will respond which prevents the Agent from contacting a broken Relay Server.
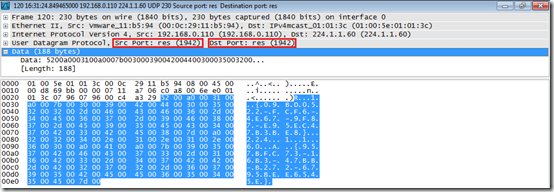
When the Agent is configured to discover Relay Servers it will multicast via UDP on address 224.1.1.60:1942. Just like the Agent and Relay Server port 1942 (registered at IANA by Bob Janssen) is used, this can’t be changed. During a UDP multicast the Agent client will use source port 1942 and destination port 1942.
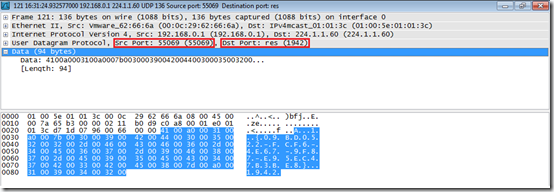
A Relay Server will answer using a dynamic source port and destination port 1942.
I’ve been informed that the address 224.1.1.60 can be changed without notice, that’s why it isn’t documented (yet).
Preconfigured (using list)
Once the Agent receives a list of Relay Servers it will pick a random server from the list and try to connect. If that connection fails it will try another server until the list is exhausted.
Resolve (using DNS)
The last discovery methods that’s used by RES Workspace Manager Agents is resolving a Relay Server using DNS. An agent will try to contact a specific Relay Server directly. This can be a Relay Server that’s used by other Relay Servers or a fallback server that normally shouldn’t be contacted.
7. Sizing and performance monitoring
Sizing a Relay Server is difficult as it highly depends on the RES Workspace Manager environment. Each environment has a different number of configuration items, amount (and type) of changes and usage tracking. Of course the interval at which agents polls for changes has a big impact on the sizing of a Relay Server.
There are some sizing numbers available:
| Poll for changes interval | Active connections |
| 5 seconds | 1000 |
| 1 minute | 2400 |
The tests were performed on a Dell PowerEdge 2950 with 2 Intel Xeon 3 GHz processors and 4 GB of memory running Microsoft Windows Server 2008 R2.
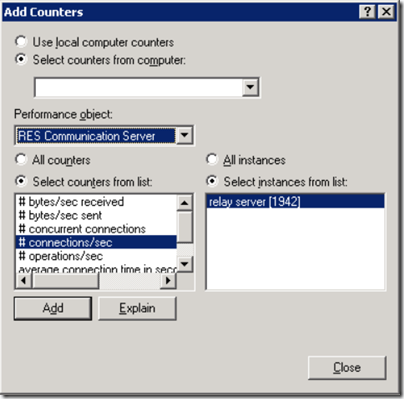
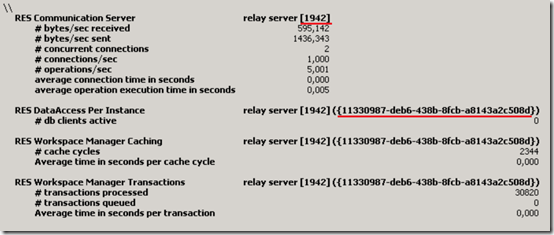
When sizing your environment it’s important to monitor the performance metrics. You can use the Windows Performance Monitor to monitor your Relay Server performance. In the Windows Performance Monitor the Performance object – for example RES Communication Server– can be selected, it will display the performance counters and the instances available.
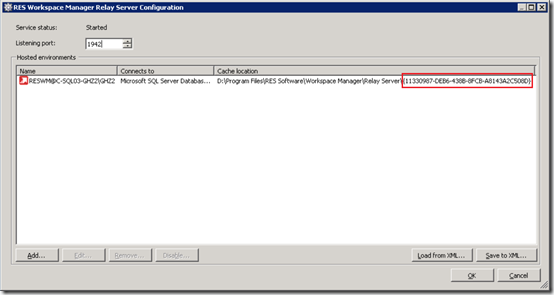
Since you can run multiple Relay Servers on a single server multiple servers can be monitored as separate instances. A single Relay Server can connect to different environments, each environment is identified using a unique identifier (GUID). This GUID Is also visible in the path of the cache location.
The performance object RES Communication Server provides the following counters:
| Component | Counter name | Description | Counter type
PERF_COUNTER_… |
| RES Workspace Manager Caching | # cache cycles | Total number of cache cycles executed | RAWCOUNT |
| “ | Average time in seconds per cache cycle | Average duration per cache cycle execution, in seconds | COUNTER |
| RES Workspace Manager Transactions | # transactions processed | Total number of transactions processed | RAWCOUNT |
| “ | # transactions queued | Total number of transactions queue | COUNTER |
| “ | Average time in seconds per transaction | Average duration per transaction execution, in seconds | “ |
| RES Communication Server | # bytes/sec received | Number of bytes received per second | “ |
| “ | # byte/sec send | Number of bytes send per second | “ |
| “ | # concurrent connections | Number of concurrent connections | “ |
| “ | # connections / sec | Number of connections per second | “ |
| “ | # operations / sec | Number of operations per second | “ |
| “ | Average connection time in seconds | Average connection time, in seconds | “ |
| “ | Average operation execution time in seconds | Average operation execution time, in seconds | “ |
| RES Data Access | # db clients active | Total number of db clients active | “ |
For more information about performance counters see the RES Workspace Manager 2012 Administration Guide.
8. Other facts
- TCP port 1942 is also used by RES Workspace Manager Agent. As a result you can’t run both on the same machine without changing the port number. This could be applicable if the same machine is used to publish Citrix applications.
- When the cache location has less then 500MB of free space it will stop caching. When the available free space increases with 10% (550MB) it will continue. This value can be changed with the registry value HKLM\SOFTWARE\RES\Workspace Manager\RelayServer\MinimumFreeDiskSpace (DWORD, value in MB)
- RES Workspace Manager 2012 SR2/SR3 Agents cannot be installed unattended when User Account Control (UAC) is enabled (a fix is available here). This is solved in SR4.
9. Troubleshooting
If you need to troubleshoot a RES Workspace Manager Relay Server environment a trace file can be enabled. To initiate the RES Workspace Manager Relay Server tracing, create the following registry entries in the key HKEY_LOCAL_MACHINE\SOFTWARE\RES\LoggingOptions
| Value | Data | Type | Description |
| Enable | 1 / 0 | REG_DWORD | Enable / disable trace logging |
| EnableFileLogs | 1 / 0 | REG_DWORD | Enable / disable storing traces in files |
| EnableMicroLogging | 1 / 0 | REG_DWORD | Enable / disable detailed logging |
| FileLogLocation | Folder path | REG_SZ | The folder where the trace file is stored (don’t specify the file name!) |
NOTE: The trace file will grow continuously, enabling trace file for a longer period is not recommended.
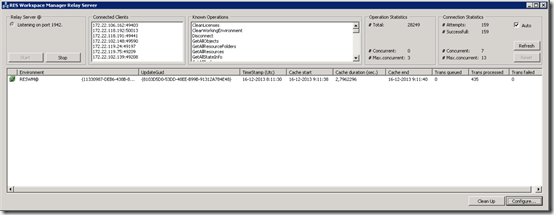
Optionally it’s possible to start the Relay Server interactively (showing a graphical interface) instead of as a service. This enables you to see what clients are connected and additional detailed information about the Relay Server. Starting the Relay Server interactive is done via the following command line:
"%ProgramFiles%\RES Software\Workspace Manager\Relay Server\relayserver.exe" /interactive
Resources
- Maximum Capacity Specification for SQL Server
- Design recommendation: Relay Servers
- Dynamic assignment Relay Servers for roaming Agents
- Setting up Workspace Manager 2012 with MS SQL Windows Authentication
- Getting Started with RES Workspace Manager SR4 Relay Server
.





Hi Ingmar – an excellent whopping article!
Just to expand on the use cases; we mandate Relay Servers when Windows Authentication is required on the SQL server(s). This mitigates the need to manage the service properties on every WM agent. The WM agents’ services can be left running under Local System account and we only need to manage the service properties/password changes on the Relay Servers.
Thanks, Iain
Good one Iain!
Now I wonder how many guys have ever seen that we have perfmon counters available 🙂
Nice that you mentioned it
Hi Ingmar,
your article really helped me out with configuring Dynamic Relay Server through DHCP!
Didn’t know you had to pick a number in the range 212 – 219 for the DHCP Scope ID, that solved it for me.
Thanks,
Mario
Thanks,
Mario