With Citrix PVS the content of a disk is streamed over the network to an endpoint. This requires sufficient bandwidth and an optimized configuration. If both criteria are not met the endpoint suffers from delays, retries or failures.
 A number of best practices apply when using Citrix PVS, most of them probably apply for your situation. In the past I had to optimize my VM’s manually each and every time I had to create a new vDisk! Ain’t nobody got time for that (link)!
I wrote a PowerShell script that optimizes the endpoint for Citrix PVS and would like to share it with you.
Updated on June 18th, 2014 with version 1.7
Applied best practices
The script applies a number of best practices to optimize the performance of the PVS endpoint. Some are enabled by default, some are not.
Disable Task Offload
The most generic best practice that applies for (almost) every PVS environment, disabling all of the task offloads from the TCP/IP transport. See also CTX117491
Disable IPv6
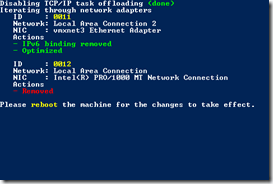
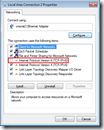 Although Citrix is working hard to get IPv6 working for all Citrix products, PVS does not support IPv6. Disabling IPv6 on your PVS endpoints prevent intermittent failures. For each network adapter the IPv6 binding is removed using the nvspbind utility. This utility is included in the download. Also, slow boots could occur due to IPv6. See also this TechNet article.
Disable TSO and DMA on XenTools
When you’re running your PVS endpoints on Citrix XenServer 5.0 or 5.5 poor target device performance, sluggish mouse responsiveness, application latency and slow moving screen changes might occur. This is a known bug that’s solved in (a hotfix of XenServer 5.6). See also CTX125157.
Increase UDP FastSend threshold
For every UDP packet larger than 1024 bytes, the Windows network stack waits for a transmit completion interrupt before sending the next packet. Unlike for earlier releases, vSphere 5.1 does not provide a transparent workaround of the situation. See also KB2040065
Set multiplication factor to the default UDP scavenge value
High CPU usage occurs when a Windows Server 2008 R2-based server is under a very heavy UDP load. This issue occurs because a table is too aggressively scavenged. See also KB2685007
Icons are hidden
To prevent users from accessing system tools like the PVS target device software or VMware tools the icons are removed.
Disable VMware debug driver
The virtual machine debug driver was disabled for this virtual machine message displays in event log. The virtual machine debug driver is not required in an ESX host. The driver is used for record/play functions in Fusion and Workstation products. See also KB1007652.
Receive Side Scaling is disabled
VMXNET3 resets frequently when RSS is enabled in a multi vCPU Windows virtual machine. When Receive Side Scaling (RSS) is enabled on a multi vCPU Windows virtual machine, you see NetPort messages for repeating MAC addresses indicating that ports are being disabled and then re-enabled. See also KB2055853.
Remove non-present NICs
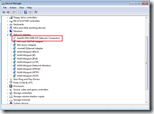 After removing a network adapter – for instance to replace an E1000 adapter with a vmxnet3 (because your deployment tool does not support vmxnet3) – the network adapter still exists on your Windows machine. The network adapter is not visible in device manager (see KB241257) but it’s active in the IP stack and, most likely, has a higher priority. As a result the PVS target device software is unable to communicate with the streaming server.
All Ethernet adapters that are not present on the machine are removed using the DevCon utility. The utility is included in the download, in case you lost it make sure you use version 6.1.7600.16385 from the Windows 7 WDK for x64 machines.
Default setting: Enabled
Network Adapter specific optimization
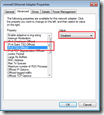 For each network adapter (E1000, vmxnet3, vmbus, etc.) best practices exists, the most generic is disabling TCP offloading. Depending on the network adapter this has different names and some have more than one feature to disable.
Default setting: Enabled
The script changes the following sets the following properties:
| Network Adapter | Property | Value |
| E1000 (VMware) | Large Send Offload (IPv4) | Disabled |
| vmxnet3 (VMware) | IPv4 Giant TSO Offload | Disabled |
| IPv4 TSO Offload | Disabled | |
| xennet6 (XenServer) | Large Send Offload Version 2 (IPv4) | Disabled |
| vmbus (Hyper-V) | Large Send Offload Version 2 (IPv4) | Disabled |
| Missing an adapter? | Drop me an e-mail at | [email protected] |
All other properties listed in the Ethernet Adapter Properties dialog can be changed as well. All known properties and values are provided in the script, all you have to do is uncomment (removing the #-character) and set the value you want. Do NOT enable options before you’ve tested this first and understand what the implications are.
Example
You want disable IPv4 Checksum Offload for the vmxnet3 adapter. The default value is 3 (Tx and Rx Enabled), to disable the feature you need to set the value to 0. In the script go to lines 256, remove the # in front of ‘Set-ItemProperty’ and set the value “0” and the end of the statement.
# --- IPv4 Checksum Offload ---
$strRegistryKeyName = "*IPChecksumOffloadIPv4"
# 0 - Disabled
# 1 - Tx Enabled
# 2 - Rx Enabled
# 3 - Tx and Rx Enabled (default)
Set-ItemProperty -Path ("HKLM:\SYSTEM\CurrentControlSet\Control\Class\{0}\{1}" -f "{4D36E972-E325-11CE-BFC1-08002BE10318}", ( "{0:D4}" -f $intNICid)) -Name $strRegistryKeyName -Value "0"
Tested platforms
The script is tested on multiple hypervisor platforms to ensure it covers the majority of the environments. In case your missing a hypervisor (or a version) feel free to contact me at [email protected].
- Citrix XenServer (6.0, 6.02 and 6.2)
- Microsoft Hyper-V (2.0, 3.0 / 2012 and 2012 R2)
- VMware ESX (4.0, 5.0, 5.1 and 5.5)
Usage and download
The script runs without arguments but requires elevated privileges, this is enforced by the script. Within the script you can enable / disable the features in the global options section (eg removing hidden NIC’s or unbinding IPv6). If wanted you can set advanced NIC properties by uncommenting the statement and providing the new value.
The script is best executed before the vDisk is uploaded but can also be run in Private mode (starting v1.6).
You can download the files here: OptimizePVSendpoint
.
Thanks
I would like to thank the following people who where kind enough to test the script and provide me with feedback and test data:
- Kees Baggerman – link
- Wilco van Bragt – link
- Iain Brighton – link
- Tom Gamull – link
- Andrew Morgan – link
- Shaun Ritchie – link
- Jeff Wouters – link
- Bram Wolfs – link
- Jonathan Pitre – link
- Julien Destombes – link
.
Well done guys. I’ve wanted to script theses taks for my self for quite some time!
I have a couple of suggestions to add:
-ARP Cache Changes
-Failover Times
– Locate the HKLM\System\CurrentControlSet\Services\Afd\Parameters registry key.
Add the value FastSendDatagramThreshold of type DWORD equal to 1500.
-[HKEY_LOCAL_MACHINE\SYSTEM\CurrentControlSet\services\BFE\Parameters]
“MaxEndpointCountMult”=dword:00000010 (See kb2685007 & kb2524732)
Sources:
http://kb.vmware.com/selfservice/microsites/search.do?language=en_US&cmd=displayKC&externalId=2040065
http://support.citrix.com/article/CTX119223
http://support.citrix.com/article/ctx127549
Also to disable IPV6 I would recommend using the reg key instead since there is known issue when you unselect it it in the network adapter settings
According to MS: “User logons from domain-joined W7 clients normally take 30 seconds but intermittently take 8 minutes. XPERF shows that a series of logon scripts called by Group Policy preferences to establish mapped network drives are taking a long time to execute. A network trace shows clients experiencing slow logons authenticating with a local DC, pulling policy from a local DC but sourcing scripts defined in Group Policy preferences from a remote DC half-way around the world. On the client computer, IPv6 is bound in Network Connections in Control Panel (NCPA.CPL) but unbound on all DCs (that is, the TCP/IPv6 check box is cleared in the network adapter properties).
Clearing the IPv6 check box does not disable the IPv6 protocol.
Enabling the IPv6 binding in NCPA.CPL and setting disabledcomponents=FFFFFFFF on the Windows 7 client results in consistently fast logons as Group Policy preferences scripts are sourced from the local DC. One change to investigate is whether creating IPv6 subnet and subnet-to-site mappings would have resolved this problem.”
http://social.technet.microsoft.com/wiki/contents/articles/10130.root-causes-for-slow-boots-and-logons-sbsl.aspx
Hi Jonathan,
Thanks for the detailed response and suggestions. I will store them for a future version of the script.
Cheers,
Ingmar
I’ve heard someone from citrix says not do disable task offload from Win2k8r2 and up and PVS 6.x, this used to be a problem in w2k3.
Do you have more info on that? I do know you don’t have to set the BNNS registry from PVS 6.x, but that’s easy since it doesn’t exist anymore 🙂
Here’s some other tweaks I like to do:
-Disable Boot Animation
http://www.remkoweijnen.nl/blog/2012/02/10/speed-up-windows-7-resume-by-20
-Hide Status Tray icon
http://www.jackcobben.nl/?p=1968
-Hide VMWare Tools
-Disable VMWare debug Driver
http://kb.vmware.com/selfservice/microsites/search.do?language=en_US&cmd=displayKC&externalId=1007652
Yet another nice list of tweaks. Thanks!
Disabling the boot animation is however NOT recommended. In the comments of the original article from Helge Klein (where Remko Weijnen is referring to) – http://helgeklein.com/blog/2012/02/how-to-speed-up-your-windows-7-boot-time-by-20/ – you can read this has no benefit.
In case you’ve downloaded version 1.4 and receive messages about missing devon or nvspbind, I forgot to included them in the archive. Their included now!
Target Device Fails to Boot on Hyper-V V2
http://support.citrix.com/article/CTX136904
Hi Ingmar,
Do you know which of these improvements apply to normal XS 6.2,
i see some of these are specific to PVS but most of them apply to normal xenserver installation
Thanks
Hi Hani,
The script is built for PVS but also applies generic optimizations (like removing a ghost NIC and disabling IPv6). Nonetheless I would not recommend running the script on any VM. Best practices should only be applied in the context where they apply.
Ingmar
Nice work as always Ingmar 🙂
Thanks Jeremy, much appreciated
SW INFO:
XS6.2SP1
PVS7.1
WIN2K8R2
I have 2 nics in my PVS server.
1 nic for join domain (with gw), 1 nic for PVS streaming.
If I disable LargeSendOffload in domain nic, it will cause problem transferring 17GB win7 vdisk to other PVS server.
In 3% it will disconnect.
Once I enable back LargeSendOffload in domain nic, it back to normal.
I think still fine if I disable LargeSendOffload in PVS streaming nic.
Hi Nawir.
There’s no need to disable LargeSendOffload on the domain NIC, only the PVS streaming NIC.
If you don’t have separate NICs for domain and streaming do you still disable LargeSendOffload?
Yes, it’s recommended to disable LargeSendOffload on the streaming NIC.
Hi! Great article! But from pdf white paper XA – Windows 2008 R2 Optimization Guide it says on page 14: Note: With Provisioning Services 6.0 and above it is no longer necessary or recommended to disable the Large Send Offload and TCP/IP Offload features. So Citrix has changed their recommendations.
Hi Daniel,
It appears there are conflicting recommendations by Citrix so I’ve asked the PVStipster, here’s his answer:
“@IngmarVerheij Hi Ingmar, yes, large send offload and broadcast technologies like PXE can have latency issues: http://support.citrix.com/article/CTX117374 …”
https://twitter.com/PVStipster/status/444079779932033024
In the KB article “CTX117374 – Best Practices for Configuring Provsioning Server On A Network” The following can be found:
“Re-segmenting and storing up packets to send in large frames causes latency and timeouts to the Provisioning Server. This should be disabled on all Provisioning Servers and clients.”
Of course a best-practice doesn’t fit in every environment, it’s a guideline which fits most environemnts.
Thanks Ingemar. This is confusing for us consults when we are configuring the PVS infrastructure when there is conflicting recommendations from Citrix:). But I’m now convinced that in the most scenarios the best practice should be to disable Large Send Offload.
XenDesktop 7.1 on Hyper-V Pilot Guide v1.0.pdf
p132 said
In pvs stream nic, disable Large Send Offload
In pvs server itself, add registry DisableTaskOffload
It didn’t mention to do that in target VDI WIN7
This what I encounter when I did
In pvs stream nic, disable Large Send Offload
In pvs server itself, add registry DisableTaskOffload
I robocopy from 1 pvs server to 2nd one.
I got error
“The specified network name is no longer available”
Waiting 30 seconds…
I didn’t get that when I didn’t do above steps.
I get same issues, poor performance with the registry settings enabled to Disable Task Offload.
File copies start failing.
Hey Ingmar,
great job!
When should I apply the script, after installing the PVS target device drivers or after creating the vDisk? Must be before creating because of ghost NIC and IPv6…
Thanx!
The script is most effective if you run the script before you upload the vDisk to the PVS server (so before booting in private mode). Most important reason is indeed the ghost NIC and IPv6.
At this moment I’m working on a version which you can run when you boot from the VDisk, at this moment I would not recommend it (as it would remove live NICs).
Ingmar, can i use this script with VDI in box?
I could not think of a reason it shouldn’t work. I would appreciate if you could test and let me know.
Hi I just ran the script on a clean install, and I lost connection to my remote desktop, it looks like the script removed all NIC´s from my VMware 5.5 virtual server 2012r2.
Have you any idea why ?
No and it shouldn’t 🙂
Can you verify if the NIC is still present? The script does remove IPv6 so it might be that you connected through IPv6 and that’s removed? If that’s not the case can you drop me an e-mail?
same for me here. after running script v 1.4 both nic’s on w2k12r2 pvs target were removed.
any news about that?
Should I be doing this on both the PVS servers and the endpoint?
I also just confirmed that the script seems to bomb on 2012 R2, devcon64 removes the network connection and crashes, leaving you with no network connection. After reboot – windows would crate a new connection, but with no IP info (DHCP would be selected)
Hey Ingmar, really great work. I’ve got just a question, how do I run the script just for my PVS adapter and skip any change for my Domain/Managment NIC?
Cheers
Hi Ingmar great script, not sure if you have had any experience with the new Xentool 6.5 NIC “XenServer PV Network Device #0” is it similar to the old Citrix PV one?
Hi all
Do all these “tweaks” still apply to PVS7.12 or PVS7.13?
Thanks
i have the same question, are these tweaks still needed with pvs 7.13 and Win 2012 R2.
pvs.7.12 Good day on my server pvs when the vm go to boot through the network is very slow and I have to restart the vm many times to get the communication with the pvs
what recommendations can I use
Do these apply to Server 2016 VDA’s and PVS 7.15 LTSR?
How do these compare to the newly released Citrix Optimization Tool made available by Citrix?