In a virtual desktop environment the profile solution provided by Microsoft, the roaming profile, is not sufficient. With the “Zero Profile Technology” RES Workspace Manager has a feature that captures users settings and injects them whenever needed, offering a more flexible solution than the roaming profile. More importantly only the required settings are captured and profile bloating and corruption is prevented.
Of course RES Software can’t replace the Windows profile so you end up with a hybrid solution, also referred to as a “hybrid profile”. Theoretically you can use any of flavor of the Microsoft profile solutions: local, roaming or mandatory and add the RES feature on top. A common used hybrid solution is a mandatory profile + RES Workspace Manager, but as Wilco van Bragt mentioned in his article about alternatives for the mandatory profile (link) this has it drawbacks.
 One of the biggest “challenges” with mandatory profiles, or roaming profiles where cached copies are deleted, is the use of certificates. Especially if you use auto-enrollment of certificates. What we’re looking for in a profile are the following characteristics:
- Works with certificates – as described above
- Removed after logoff – to prevent the computer from filling up with garbage
- Stateless – or non-persistent. In other words, it does not store changes made by the user. Each time a user starts a session it should consist of the exact same settings, the profile solution (RES Workspace Manager) will inject the settings.
As Wilco describes in his article the local profile is the best candidate for a hybrid profile. But the local profile has one drawback: it persists on the computer.
Enforce Local Profiles
On your RES Workspace Manager (WM) agents (your Windows desktop machines or Hosted Shared / Private Desktops) you want to enforce the use of local profiles. Especially in a mixed environment where roaming profiles are used they can be configured at multiple levels, by enforcing the use of local profiles you can prevent them from being used.
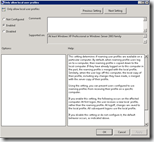
 The computer policy Only allow local user profiles prevents the users configured to use roaming profiles from receiving their profile. The policy setting is in the Computer Configuration\Administrative Templates\System\User Profiles node.
Remove at logoff
Guest profile
To avoid the agent from filling up with profiles, and to ensure a user always get a clean profile, the profile needs to be removed when a users logs off. Windows has no built-in functionality to remove a local profile at logoff, like it does for a roaming profile, except for guest users. If you make Windows believe that the users profile is a guest profile it will treat it accordingly, and remove the profile at logoff.
Profilelist
Windows registers each profile in the registry key HKLM\SOFTWARE\Microsoft\Windows NT\CurrentVersion\ProfileList. For each user a key is created with the users unique secure identifier (or SID). Besides specifying where the profile is located (ProfileImagePath) and what the users secure identifier is (Sid) the state of the profile is stored in the State value. The name state implies this is a dynamic value which can change (unlike the Sid).
The value of the State value is an enumeration of values. For instance with a mandatory profile the state is set to 0x1 and when a profile can’t be loaded the state will be set to 0x800 (temporary profile loaded). The value for a guest profile is 0x80 (or 128 decimal).
Change state value
The only reason we want to change the state value is to trick Windows in believing it’s a guest profile at logoff, so it will remove the profile. So the best moment to change the value is  during logoff.
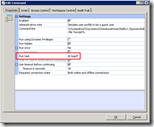
With RES Workspace Manager you can create a command that runs at logoff. Changing the value can be done with a batch or PowerShell script (slower and requires ExecutionPolicy to be lowered).
Batch
Command line: %script%
Script extension: cmd
Script:
REM Name        : SimulateGuestUser.cmd
REM Author      : Ingmar Verheij - www.ingmarverheij.com
REM Version     : 1.0, 03-08-2013
REM               1.1, 10-01-2014 (removed first 12 characters from SID instead of 7)
REM Description : Tricks Windows in believing the users profile is a guest profile by
REM               changing the state to 0x80

@ECHO OFF
REM Expand variables at execution time rather than at parse time
SETLOCAL EnableDelayedExpansion

REM Determine user SID
FOR /F  "skip=5 tokens=2 delims=:" %%i IN ('WHOAMI /USER /FO LIST') DO SET SID=%%i

REM Remove leading spaces
SET SID=!SID:~12!>REM Set the state of the current users profile to PROFILE_GUEST_USER (0x80)
REG ADD "HKLM\SOFTWARE\Microsoft\Windows NT\CurrentVersion\ProfileList\%SID%" /v State /t REG_DWORD /d 0x80 /f
PowerShell
Command line: %systemroot%\system32\WindowsPowerShell\v1.0\powershell.exe %script%
Script extension: ps1
Script:
# Name        : SimulateGuestUser.ps1
# Author      : Ingmar Verheij - www.ingmarverheij.com
# Version     : 1.0, 03-08-2013
# Description : Tricks Windows in believing the users profile is a guest profile by
#               changing the state to 0x80

# Set the state of the current users profile to PROFILE_GUEST_USER (0x80)
Set-ItemProperty -Path ("HKLM:\Software\Microsoft\Windows NT\CurrentVersion\ProfileList\{0}\" -f

([Security.Principal.WindowsIdentity]::GetCurrent()).User.Value) -Name State -Type DWORD -Value 0x80
Permissions
By default only administrators can change the values in ProfileList\%SID, a normal user can’t. This can be mitigated in (at least) two ways:
- Run the task with Dynamic Privileges;
- Grant permissions to users to change values.
The first option, running the task with Dynamic Privileges, is the most secure method as it’s the most granular. No additional permissions are granted and the users can’t change any value in the registry, instead a token is injected at runtime to grant the required permissions. For this feature you require the the Security & Performance module which is part of the gold edition and can be part of the silver edition.
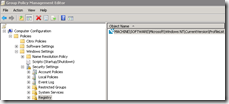
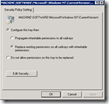
To limit the risk of granting permissions to users you should minimize the granted permissions as much as possible. By only granting Authenticated users (instead of everyone) you ensure that users are authenticated, excluding guest users. The only required permissions to write a value are Set Value and Create Subkey (see KEY_WRITE). One way to achieve this is via a group policy object:
Default profile
When a new user logs in and no profile exists the default profile is copied. During this phase the users gets permissions granted to his profile, unlike with a mandatory profile where all users have access to the mandatory profile (and as a result on all other profiles!).
With the Profile Update Utility (PuU), which is part of the Virtual Engine Toolkit (VET), you can easily open the NTUSER.dat (the users registry) and for instance enable Aero. Notice that this file is hidden.
Be VERY careful when changing the default profile! All users rely on the default profile, including administrative accounts that have no profile on the agent! Breaking the default profile can potentially block access to the machine!
You can use software like Microsoft DFSR to replicate the folder between a number of agents or use (startup) scripts to pull the profile from a shared location.
.


In case your looking for a similar solution for AppSense Environment Manager: Michel Stevelmans wrote an excellent article on how to achieve this.
http://www.michelstevelmans.com/local-profiles-appsense-personalization-powershell/
FYI: In case you don’t want to lower the ExecutionPolicy you can use batch script provided in this article.
Hello Ingmar,
Thanks for the info, i already used Michel Stevermans guide and now implemented this one, nice verry nice
Two little things. The CMD does not work on XP because whoami is missing and the version comes with support tools does not support /FO.
For Powershell you can use “Powershell -ExecutionPolicy Bypass -file %script%” in your command line so you don’t have to change your Powershell execution policy
Just for your info
Hello Ingmar,
great article! what kind of problems did you have with mandatory profiles and certificates?
I’m using mandatory profiles with the RES Profile solution to save certificates and it works fine (at least i didn’t receive any complaints about it).
We don’t use auto-enrolled certificates with this customer.
i’ve looked at the RES knowledgebase and found an article that tells RES is spooing the mandatory profile as roaming profile to be able to save the certificates and be able to use them (Q202534 Mandatory profiles show up as roaming when logged on with RES PowerFuse)
offcourse there are more challenges with mandatory profiles besides certificates, unfortunately 🙁